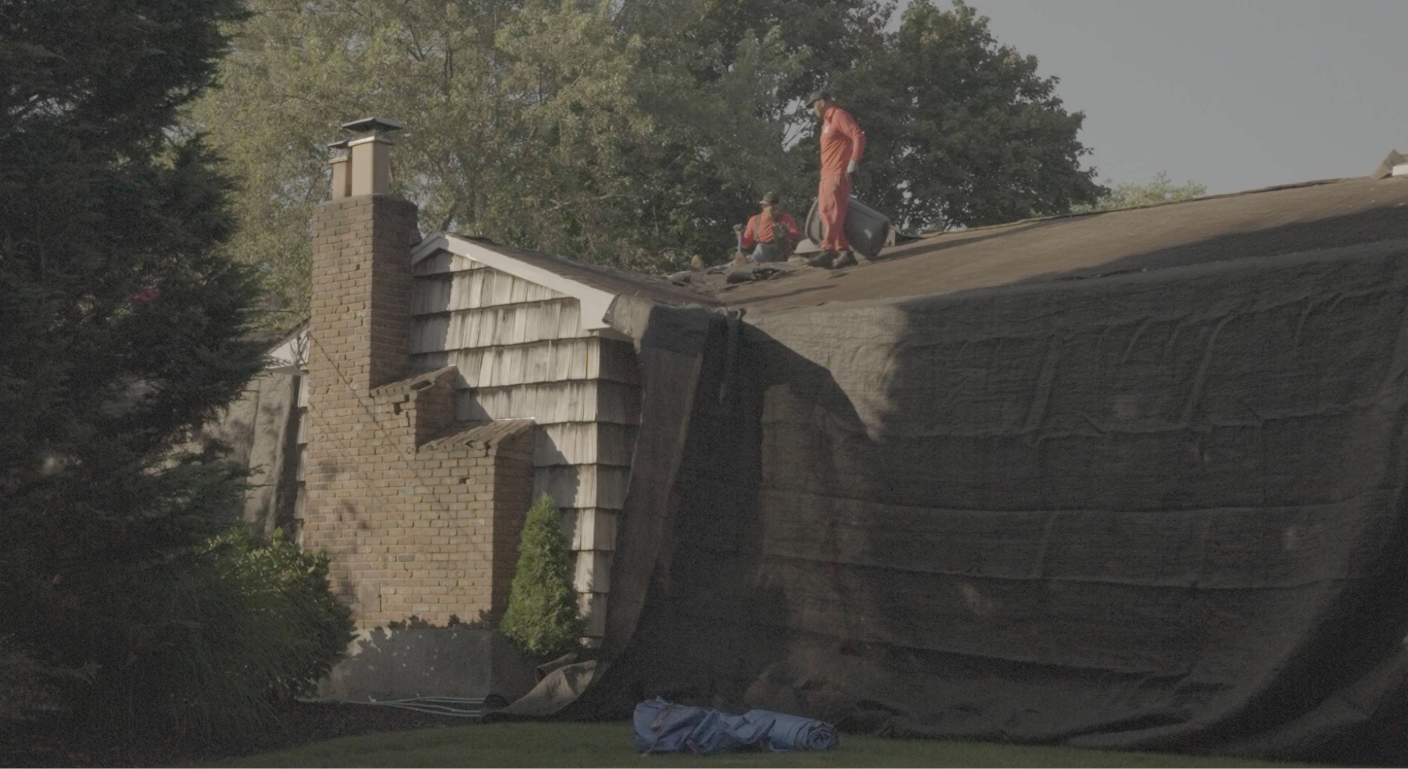
Flashing chimney repair stops leaks and protects your home from water damage. If you’re reading this, you’ve probably spotted a warning sign like water stains or drips; your flashing has likely failed. And you’re right to be concerned.
Here’s why this matters: a small leak from failed flashing is the leading cause of water damage in homes with chimneys. In fact, it can lead to rotted roof decking (costing $1,500+ to replace), mold remediation (averaging $2,500), and ruined insulation ($1,000+). The problem won’t fix itself; it only gets worse with each storm.
Studies show that poor flashing contributes to nearly 30% of all roof leaks in the U.S. At ReadyRoofLI, we specialize in Long Island chimney flashing repairs. Our team combines years of experience with top-quality materials, ensuring every repair lasts.
What is Chimney Flashing?
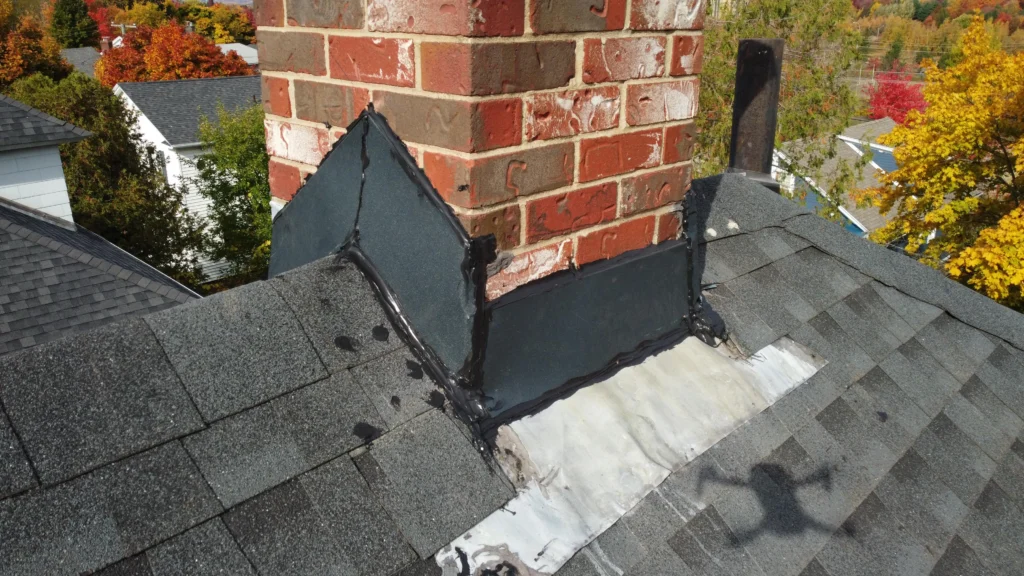
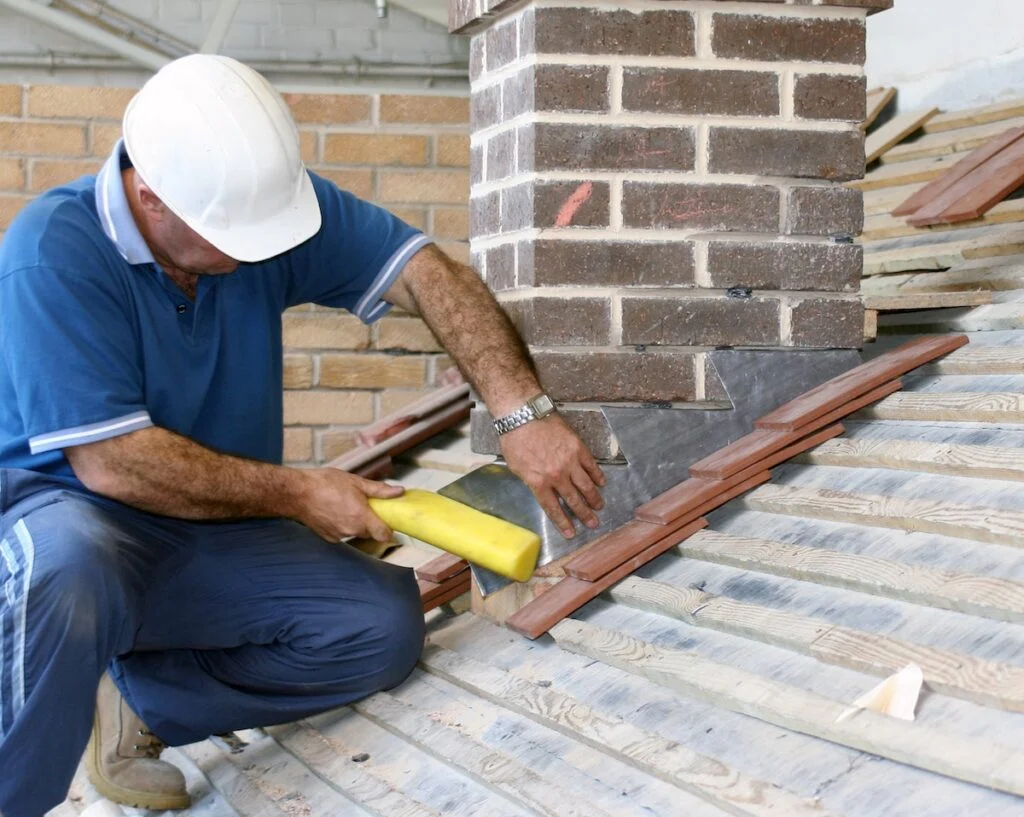
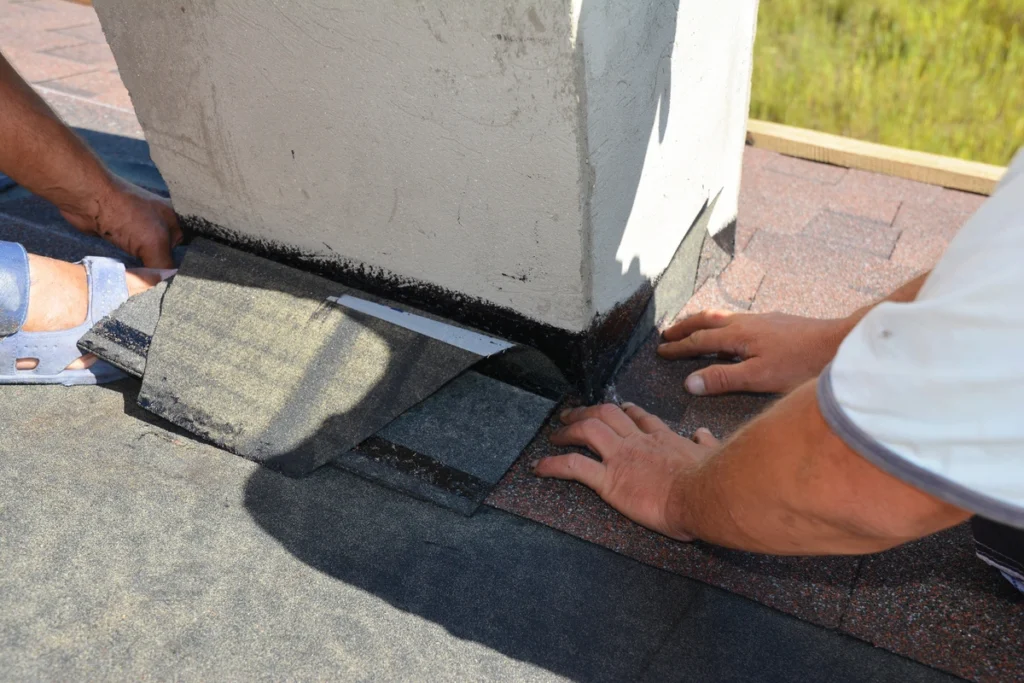
Chimney flashing is like a custom-made, flexible raincoat for that exact spot. It’s a system of metal strips, usually aluminum or copper, that bridges the gap between your shingles and your bricks. But it’s not just slapped on there. It’s a clever two-part team:
- The part under the shingles: First, there’s the base layer. This metal gets woven underneath your roof shingles, directing water safely down and away. It’s the first line of defense.
- The part in the bricks: Then, a second piece of metal is actually sealed into the chimney’s mortar joints. This top layer gets folded down over the first one.
Why the two-part system? Your roof and chimney don’t move together. The chimney is solid and sturdy, while the roof flexes a little with the wind and weather. If you used one solid, rigid piece, it would crack or pull apart in no time. This over-and-under design lets them shift independently without breaking the seal. It’s genius, really.
When your chimney flashing is doing its job, you won’t even think about it — and that’s a good thing. But when it starts to fail, the signs show up fast: a small water stain on the ceiling, damp insulation, or that musty smell after a storm.
It may look like a tiny strip of metal, but flashing has a big job — keeping your home dry and protected from the weather. It works together with your shingles and roof layers to stop rain from sneaking in where the chimney meets the roof.
Want to see how all these parts come together to protect your home? Check out our Roof Repair Services in Long Island page for a simple breakdown of how proper installation keeps your roof strong year-round.
Common Causes of Flashing Failure on Long Island Homes
Thermal Expansion and Contraction
Summer heat makes the metal on your roof expand. Winter cold makes it contract. We go through this cycle every single year, and over time, that constant flexing can weaken the flashing and crack the sealant around it. Add in the powerful winds from a Nor’easter, and it’s no wonder the metal can eventually work itself loose.
The Freeze-Thaw Cycle
This is a huge one for us. Rainwater seeps into the tiny cracks in the mortar around your flashing. Then, when the temperature drops, that water freezes and expands, making the cracks bigger. The next thaw makes space for more water. This cycle repeats all winter, slowly crumbling the mortar that holds the critical top piece of your flashing in place
.If you live near the coast, that constant mix of salt air, freezing temperatures, and heavy storms makes things even tougher on your roof. To learn more about how coastal weather impacts roofing systems, check out FEMA’s Storm Preparedness Guide. It’s full of smart, practical tips to help protect your home year-round.
Chimney Movement and Settling
It’s normal for your house to settle over time. But your foundation and your chimney’s foundation might settle at slightly different rates. This creates a tiny gap between the chimney and the roof. Just enough to pull the flashing out of its perfect seal and let water in.
Material Fatigue and Poor Installation
Sometimes, the problem was there from day one. If the previous roofer used cheap materials or took shortcuts, like relying on roof tar instead of properly weaving the flashing. It was only a matter of time before it failed. You can’t expect a quick fix to last for decades.
Just Plain Old Age
Nothing lasts forever. After 20 or 30 years, even a perfectly installed flashing can simply wear out. The metal gets brittle, and the seals give up. It’s not anyone’s fault; it’s just time for a replacement.
Your Flashing Chimney Repair Options: DIY vs. Professional
So, should you grab a caulk gun or your phone? Here’s how to decide.
DIY Repair is an option if:
- The leak is minor and confirmed to be from a small, accessible gap.
- You are comfortable working on your roof safely.
- The flashing itself is in good shape, but the sealant has failed.
Call a Professional Roofer is necessary if:
- The leak is significant, or the source is unknown.
- The flashing is rusted through, bent, or missing sections.
- The mortar is crumbling and needs to be repointed.
- You have a steep roof, multiple stories, or any safety concerns.
- You’ve tried a DIY fix, and the leak persists.
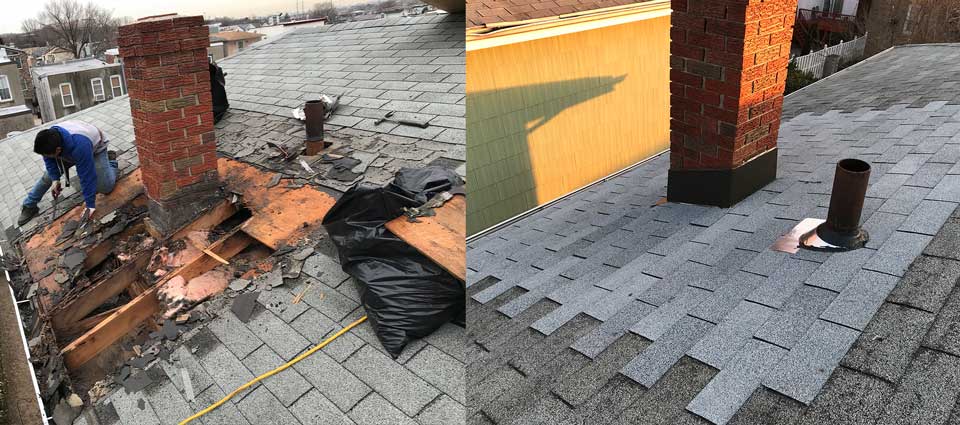
A Step-by-Step Guide to Flashing Chimney Repair
Tackling a small flashing leak can be straightforward if you’re methodical. This guide will help you seal the most common leak point: the seam between the metal flashing and the chimney bricks.
Your Toolkit:
- Wire Brush
- Caulk Gun
- High-Quality Flashing Sealant (Polyurethane is best)
- Putty Knife or an Old Spoon
- Gloves & Safety Glasses
Step 1: The Safety Check
Before you climb up, assess the situation. Is your roof steep or high? Are you comfortable and stable up there? If you have any doubt, stop. This is the most important step. For everyone else, pick a dry, calm day to work.
Step 2: Track Down the Leak
Look for the thin line where the metal from the chimney overlaps the base flashing. Now, look closer. You’re searching for cracks, gaps, or brittle, old caulk. This is your enemy. Mark it mentally.
Step 3: The Deep Clean
This step is non-negotiable. New sealant won’t stick to dirt or old, failed caulk. Use the wire brush to aggressively scrub the entire gap. Go back and forth until you see clean brick and bare metal. Blow or brush the dust away.
Step 4: The Caulk Line
Snip the tip of your sealant tube. Start with a small hole. You can always make it bigger. Load the tube into the gun. Press the tip firmly into the gap you just cleaned. As you squeeze the trigger, slowly pull the gun along the seam, filling the gap from behind.
Step 5: The Smooth Finish
Don’t just leave a messy bead of caulk. Within a minute of applying it, use your putty knife or the back of the spoon to smooth and press the sealant. Shape it into a clean, sloping fillet that pushes water away from the chimney.
Step 6: The Final Test
Your work here is done. Now, let nature take over. The sealant needs at least 24 hours to fully cure. The next time it rains, be your own inspector. Check the area where you worked. Is it dry? Congratulations, you’ve solved the problem.
If you’re looking at any of these situations, it’s time to call a pro:
- This is a surface fix. If you see any of these, your DIY mission is over:
- The metal flashing itself is rusted through, torn, or bent out of shape.
- The mortar joints holding the flashing are crumbling.
- The leak is widespread, and you can’t find a single source.
- You’ve done this repair before, and the leak returned.
For more practical maintenance advice, read our blog on Roof Maintenance Tips for Long Island Homes.
Chimney Flashing Repair Cost: A Guide for Long Island
How much you’ll pay depends on the materials, roof pitch, and damage level. Here’s what to expect in 2024:
| Type of Service | Average Cost (Long Island) | Notes |
| Minor reseal or patch | $250 – $600 | For small leaks or partial repairs |
| Full flashing replacement | $800 – $1,500 | Standard aluminum or steel |
| Premium copper flashing | $1,200 – $2,000+ | Longest lifespan, best corrosion resistance |
Pro Tip: Spending a bit more upfront on copper or stainless flashing can save thousands in future roof repairs, especially in coastal regions like Long Island.
Flashing Repair Around Chimney: Common Mistakes to Avoid
Ever tried fixing your chimney flashing and thought, “How hard can this be?” Turns out, a few small missteps can cause big headaches. One of the biggest mistakes is thinking a little caulk will do the trick. It might stop a tiny leak, but it can’t fix bent, rusty, or poorly installed flashing.
Another common blunder is shingles not sitting right over the flashing. If water sneaks under instead of running off, you’ll see leaks sooner than you expect. Skipping counter flashing or forgetting a waterproof barrier is another way to invite trouble.
And even after a repair, failing to double-check your work or ignoring small rust spots can turn into rot, mold, and bigger repairs down the line.
Choosing the Right Pro: Roofer vs. Chimney Sweep
Ready to hand off your chimney flashing repair? Let’s make this simple. Meet the Specialists:
The Chimney Sweep: Your Fire Safety Expert
This pro focuses on the inside of your chimney. They’re who you call for:
- Removing dangerous creosote buildup
- Inspecting your flue liner
- Making sure your fireplace vents properly
They’re essential for preventing chimney fires.
The Licensed Roofer: Your Water Protection Expert
This specialist handles everything from the roof surface outward. They’re your go-to for:
- Installing and repairing flashing
- Replacing damaged shingles
- Ensuring proper water drainage
They’re experts at keeping water out of your home.
For chimney flashing repairs, you need a roofer. Here’s why:
The leak you’re experiencing originates from where your roof meets your chimney. This is a roofing specialist’s exact area of expertise. Roofers understand how to properly integrate flashing with your roof’s drainage system and create watertight seals that last.
While some chimney sweeps might offer flashing repairs, they often partner with roofing companies to actually do the work. By hiring a qualified roofer directly, you’re ensuring that the person on your roof is specifically trained to solve your exact problem.
Why ReadyRoofli is Your Right Choice
So, you’ve figured out you need a roofer. Now you’re wondering, “Why should I pick you guys?” It’s a fair question. Let us give you a few good reasons.
We proudly serve homeowners across Long Island and Suffolk County, NY, offering specialized flashing chimney repair designed for local weather conditions.
First off, we’re local. We’re not some big national company that just has a phone number here. We live in these towns too. We know exactly how a storm in Levittown can damage a roof differently than one in Lindenhurst. This local know-how means we build and fix roofs to last under our specific weather, not some generic standard.
We also believe in being straight with you. No confusing jargon, no surprise fees. When we come out, we’ll give you a clear, honest assessment and a fixed-price quote. We’ll tell you what needs to be fixed now, and what can probably wait. We believe trust is everything, and we work hard to earn yours.
At the end of the day, we’re not just fixing your roof; we’re protecting your home. And that’s a responsibility we take seriously.
Frequently Asked Questions About Flashing on Chimney Repair
Q1. How do I know if my chimney flashing is leaking?
If you notice water stains on your ceiling, damp attic insulation, rusted or lifted flashing, or peeling paint around the chimney, your flashing may be leaking. Early detection prevents bigger damage.
Q2. Can I repair the chimney flashing myself?
Minor sealant repairs are possible, but most flashing issues need professional installation. Improper repair can lead to leaks and costly water damage.
Q3. How long does chimney flashing last?
Flashing usually lasts 15–25 years. Copper lasts the longest, aluminum and steel slightly less. Exposure to salt air, storms, and sun can shorten its lifespan.
Q4. How much does chimney flashing repair cost?
Costs vary depending on materials and roof type. Small repairs start around $250–$600, while full replacements range from $800–$2,000 on Long Island. Copper flashing costs more but lasts longer.
Q5: Why do chimney leaks often appear after a heavy snowstorm?
Melting snow sits against the chimney and finds its way into small cracks in old sealant that are invisible during dry weather.
Q6: What is the difference between step flashing and counter-flashing?
Step flashing sits under the shingles, while counter-flashing is embedded directly into the chimney’s mortar joints for a second layer of defense.
Q7: Can you repair the chimney masonry while fixing the flashing?
Yes. We evaluate the “whole system,” including the bricks and mortar, to ensure water isn’t seeping through cracked joints or porous masonry.
Q8: Will I need to replace my shingles to fix a flashing leak?
In most cases, we can carefully remove the surrounding shingles and reinstall them once the new metal flashing is securely in place.
Bottom Line
Your chimney flashing may be out of sight, but it’s too important to ignore. Small leaks, rust, or gaps can quickly lead to water damage, mold, or costly roof repairs. Knowing the signs, causes, and repair options helps you stay ahead and protect your home. For Long Island homeowners, professional flashing repair guarantees lasting results and peace of mind.
Don’t wait until a small leak turns into a major issue. Contact Ready Roof LI for trusted chimney flashing repair in Long Island.
See what homeowners say about our service on Google Reviews